jueves, 30 de julio de 2015

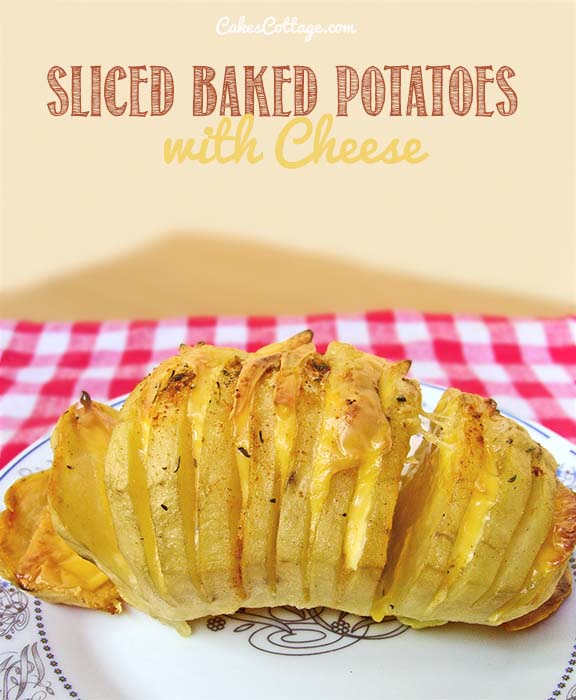
{Sliced Baked Potatoes with Cheese}


Leave a reply
This entry was posted in Appetizers, Main-Dish and tagged butter, Cheddar Cheese, Potatoes on April 30, 2014 by Dan.

7.3k
1.3k
7
13
Potato slices, stuffed with herbs and cheese.Sliced Baked Potatoes with Cheese

There’s something totally delicious about potatoes. Baked potatoes are great. Potato chips are great too. Fortunately, we live in a world where we can have the best of both worlds.

We can thank the Swedes — and the chefs at Restaurant Hasselbacken, in particular — for the invention of this particular style of potato, they discovered that slicing your potato into thin segments before baking can yield crispy edges, and a soft potato center. Once you try a Hasselback style sliced potato, you’ll wonder why you waited so long to try it, and it looks like a very fancy side dish, but is actually very easy to do.
Okay, let’s move on to today’s recipe.
There’s something totally delicious about THESE Hasselback style sliced potatoes.

It’s called CHEESE.

We know cheese makes everything better, and it totally does in this recipe. Not that these potatoes wouldn’t be delicious on their own, aka no cheese, but cheese brings a whole new flavor dimension. To anything.
I know, right? It’s totally rocking! So just embrace these potato slices, my friends, stuffed with mashed potatoes, herbs and cheese.

Sliced Baked Potatoes with CheeseThese were a huge dinner success at my house. You can customize the toppings to what each person in your family likes (great way to use up any leftover ham or bacon from the holidays!).


Sliced Baked Potatoes with Cheese


Print
Prep time
15 mins
Cook time
50 mins
Total time
1 hour 5 mins

Author: CakesCottage
Recipe type: Appetiser, Main Dish
Serves: 4
Ingredients
4 large baking Potatoes
salt and pepper
4 tbs melted butter
8 oz Cheddar Cheese or Parmigiano-Reggiano, sliced thinly.
⅛ teaspoons Garlic Powder.
2-3 Tbs chopped fresh herbs (or 2-3 tsp dried):
try basil, thyme, ground red pepper, oregano, chives, or Italian seasoning
Instructions
Preheat oven to 425° F.
Scrub, rinse and dry potatoes.
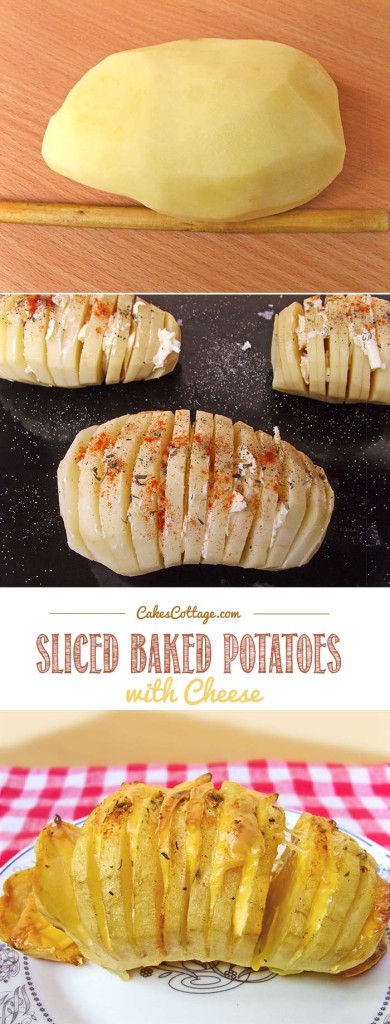
Keeping potatoes in whole form, cut into ¼-inch-thick slices almost all the way through to the bottom. To avoid cutting potatoes all the way through, place the handle of a wooden spoon next to the potato to stop the knife from cutting too far.
Put potatoes in a baking dish, then fan the slices open slightly.
Slice the butter into thin pieces and stuff them in between every other slice of the potato, without breaking slices off.
Gently sprinkle herbs in between slices and on top of potatoes and sprinkle with salt and pepper.
Bake potatoes for about 40 minutes or until tender.
To test tenderness, pierce a portion of a potato with the tip of a pointed knife or tines of a fork.
Remove dish from oven and insert cheese into slices, being careful not to bust the potatoes.
Return to oven for another 10 minutes.
Remove and serve!


Fuente: cakescottage.com

{Baked Garlic Parmesan Chicken}


21 Replies
This entry was posted in Dinner, Main-Dish and tagged Chicken, Garlic, Parmesan on March 9, 2015 by Dan.

277k
627
17
5
Baked Garlic Parmesan Chicken is one of those everyone-should-know-how-to-make recipes. It’s easy and comes together quickly. In fact, it’s hard to mess up!
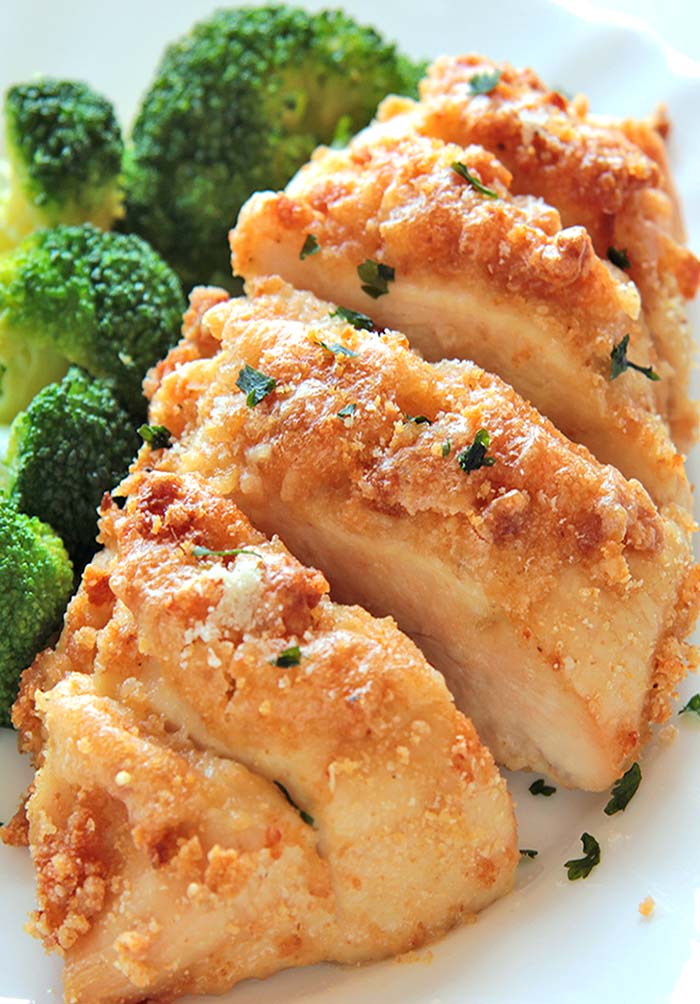
baked garlic parmesan chicken b1

What to cook when You don’t have time to cook ? You know the feeling when you get home after a long day, it can be really hard to figure out how to cook healthy meals when you still have a million things to do and all you want to do is lie on the couch.

Don’t get me wrong, I’m not whining. Anyway.
The point I’m trying to make is this, You’d have a set of “go-to” meals that could be made quickly with minimum effort and planning. This Baked Garlic Parmesan Chicken is one of those meals that I have adored because I am always looking for easy recipes for chicken. I’ve had a few comments lately from some of you asking for simpler, easy dinner recipes that are kid-friendly too ! Take note everyone, this is one of them!
With 5 minutes of prep time and around 40 minutes of baking time – it’s totally true and totally amazing, making this dinner is probably even less work than going out or getting takeout, and– HELLO! It’s Chicken breasts, garlic, parmesan and bread crumbs baked in the oven with a drizzle of mayonnaise! What’s not to love?!
baked garlic parmesan chicken a1


5.0 from 2 reviews
Baked Garlic Parmesan Chicken


Print
Prep time
5 mins
Cook time
40 mins
Total time
45 mins

Author: CakesCottage
Recipe type: Dinner
Serves: 4
Ingredients
½ cup Mayonnaise
½ cup shredded Parmesan cheese
4 boneless skinless chicken breast cutlets.
4-5 teaspoons Italian seasoned dry bread crumbs
½ teaspoon garlic powder
pinch of salt
½ teaspoon lemon pepper
Instructions
Preheat oven to 400 degrees F.
In a small bowl combine mayo, garlic powder, and parmesan cheese.
Moisten chicken breasts with water and lay on baking sheet (I line my baking sheet with parchment paper to make clean up easy)
Divide the mayonnaise mixture evenly among the chicken, just spreading it across the top of each piece, and sprinkle with salt and pepper to taste.
Bake for 15-20 minutes, remove from oven and sprinkle bread crumbs on each piece of chicken.
Return to oven and bake for additional 20 minutes or until chicken is cooked thoroughly and juices run clear.
Tops will be browned and chicken will be incredibly juicy.
You can also finish them off under the broiler for a minute or two to get them extra browned on top.
Serve with a veggie like these delicious fresh broccoli that I steamed.
Season with a dash of fresh parsley, if desired.
baked garlic parmesan chicken 1a


This post may be linked up to a number of link parties. Here is a list of Link Parties I participate in.

Fuente: cakescottage.com

miércoles, 29 de julio de 2015

{Tomato Soup with Arugula, Croutons, and Pecorino}


SERVINGS: 4

Ingredients


2 slices thick country-style bread, torn into bite-size pieces
4 tablespoons olive oil, divided, plus more for drizzling
Kosher salt
1 large white onion, thinly sliced
2 garlic cloves, crushed
2 tablespoons thyme leaves
Freshly ground black pepper
1½ pounds beefsteak tomatoes, cut into wedges
Hot sauce
1 cup baby arugula
1 ounce Pecorino, shaved
Recipe Tips

COMMON MISTAKES
Your Tomatoes Are Begging You: Don’t Make These Common Gazpacho Mistakes

COOKING TIPS
How to Make Ice Cream Without a Machine (Hooray!)

HOW-TO
Get Ready to Make Some Seriously Awesome Ice Cream


Preparation
Preheat oven to 400°. Toss bread with 2 Tbsp. oil on a rimmed baking sheet; season with salt. Bake, tossing halfway through, until golden brown and crunchy, 8–10 minutes; set croutons aside.

Heat 2 Tbsp. oil in a large skillet over medium. Add onion, garlic, and thyme; season with salt and pepper. Cook, stirring often, until onion is soft, 5–7 minutes. Add tomatoes and cook, stirring often, until they just start to release their juices, about 1 minute. Add 1 cup water and bring to a boil. Transfer tomato mixture to a blender and blend until smooth; taste and add hot sauce to your liking. Season with salt and pepper. 

Drizzle soup with more oil and top with arugula, Pecorino, and croutons. 

Do Ahead: Croutons can be made 1 day ahead. Store airtight at room temperature.
Recipe by Joshua McFadden, Ava Gene's, Portland, OR
Photograph by Peden & Munk
Created For You Say Tomato, We Say Make These Recipes Immediately

Fuente: www.bonappetit.com

{Crispy Potato Cake with Garlic and Parsley}


PUBLISHED: OCTOBER 2013
12345
SERVINGS: 8
 Crispy Potato Cake with Garlic and Parsley Recipe
Recipe Comments (51) Share It
Crispy Potato Cake With Garlic And Parsley
A decadent side that goes with almost everything—even breakfast.

Ingredients
SERVINGS: 8
4 tablespoons unsalted butter, divided, plus more for pan
6 garlic cloves, thinly sliced
3 pounds small Yukon Gold potatoes, peeled, sliced ¼” thick
Kosher salt and freshly ground black pepper
6 tablespoons duck fat or unsalted butter
½ cup fresh flat-leaf parsley leaves
Recipe Tips

INGREDIENTS
In Defense of Potatoes, Because They Only Deserve Praise

RECIPES
34 of Our Favorite Potato Recipes Ever

COOKING TIPS
How to Cook Winter Vegetables When You’re Sick of Winter Vegetables


Preparation
Special Equipment:
An 8"-diameter cake pan
Instructions
Preheat oven to 350°. Generously butter cake pan; set aside.
Heat 2 Tbsp. butter in a large skillet over medium heat. Add garlic and cook, stirring, until golden brown, about 4 minutes; transfer to a paper towel–lined plate.
Add remaining 2 Tbsp. butter to skillet. Once butter is melted, add potatoes; season with salt and pepper and cook, tossing occasionally, until beginning to soften, 6–8 minutes. Add duck fat and continue to cook potatoes, tossing occasionally, until tender and golden brown in spots, 15–20 minutes longer.
Transfer potatoes to prepared cake pan, pressing down firmly and evenly (this will help potatoes hold together when you turn the potato cake out). Bake potatoes until crisp on top, 12–15 minutes. Let cool 5 minutes, then invert potato cake onto a plate, season with salt and pepper, and top with parsley and reserved garlic.
Do Ahead: Potatoes can be sautéed and arranged in cake pan 6 hours ahead. Cover and chill; bake 10–15 minutes longer to warm through.
Recipe by Mimi Thorisson
Photograph by Oddur Thorisson

Fuentewww.bonappetit.com

{Eggplant Parmesan with Fresh Mozzarella}


SERVINGS: 8
 Eggplant Parmesan with Fresh Mozzarella Recipe
Recipe Comments (108) Share It
Eggplant Parmesan With Fresh Mozzarella
Removing all but a strip of the eggplant’s skin lets the flesh meld with the sauce without falling apart.

Ingredients
SERVINGS: 8
¾ cup plus 2 Tbsp. olive oil, divided
1 medium onion, finely chopped
10 garlic cloves, 2 finely chopped, 8 whole
2 tablespoons tomato paste
1 28-oz. can whole peeled tomatoes
Kosher salt and freshly ground black pepper
4 medium or 8 small eggplants (about 4 lb.), halved lengthwise
8 sprigs oregano
1¼ cups coarse fresh breadcrumbs
12 oz. fresh mozzarella, torn into bite-size pieces
3 oz. Parmesan, finely grated (about ¾ cup)
Recipe Tips

RECIPES
Eggplant Parm Is the Greatest Recipe of All Time

IN SEASON NOW
How to Buy, Store, and Cook With Eggplant, in Season in July

COMMON MISTAKES
Eggplant Common Mistakes—And How to Avoid Them


Preparation
Heat ¼ cup oil in a medium saucepan over medium-high heat. Add onion and cook, stirring occasionally, until beginning to brown, 6–8 minutes. Add chopped garlic and cook, stirring, until fragrant, about 1 minute. Add tomato paste and cook, stirring, until beginning to darken, about 2 minutes. Add tomatoes, crushing them with your hands as you add them; season with salt and pepper. Bring to a boil, reduce heat, and simmer, partially covered, mashing tomatoes occasionally, until slightly thickened, 15–20 minutes. Set tomato sauce aside.
Preheat oven to 400°. Using a vegetable peeler, remove skin from rounded side of each eggplant half, leaving a 1” strip of skin around the cut edges. Divide eggplants, oregano sprigs, whole garlic cloves, and ½ cup oil between 2 large rimmed baking sheets. Turn eggplants to coat with oil; season with salt and pepper and place cut side down. Cover baking sheets tightly with foil and bake until eggplants are very soft, 40–45 minutes.
Toss breadcrumbs and remaining 2 Tbsp. oil in a medium bowl. Transfer eggplants, oregano, and garlic to 2 large shallow baking dishes, placing eggplants cut side up. Top eggplants with tomato sauce and mozzarella, then sprinkle with breadcrumbs and Parmesan. Bake until mozzarella is bubbling and breadcrumbs are golden, 25–30 minutes.
Do Ahead: Tomato sauce can be made 3 days ahead. Let cool; cover and chill. Eggplants can be cooked 1 day ahead. Keep covered; chill. Entire dish can be assembled 4 hours ahead. Cover and chill.
Recipe by Dawn Perry
Photograph by Marcus Nilsson

Fuentewww.bonappetit.com

viernes, 17 de julio de 2015

{Cherry Lime Ice Pops}


Cherry Lime Ice Pops – just 4 ingredients!
Pin on Pinterest

Sweet summer cherries with a touch of lime make these sweet popsicles a perfect treat on a hot summer day.


I love the deep red color you get from using real cherries and the flavor is not that artificial cherry taste you get from those imitation flavored pops, it's richer with a more intense cherry taste.

If you plan on making these, I highly recommend buying a cherry pitter, there are so many to choose from on Amazon. Stay cool!

PS- You can find the popsicle molds on Amazon too! I used this mold, with regular popsicle sticks.


Cherry Lime Ice Pops
Skinnytaste.com
Servings: 4  Serving Size: 1 popsicle • Old Points: 2 pts • Points+: 3 pts
Calories: 122 • Fat: 0.2 g • Carbs: 31 g • Fiber: 2.4 g • Protein: 1.3 g • Sugar: 27 g
Sodium: 0.2 mg

Ingredients:

1 lb cherries
1/2 cup water
1/4 cup sugar
3 tbsp fresh lime juice

Directions:

Stem the cherries and remove the pits.  In a medium saucepan over medium heat, combine the cherries with the water, sugar, and lime juice, and cook until the cherries are very soft and cooked through, about 10-15 minutes.  Remove from heat and let it cool to room temperature.

Puree the cherries and their liquid and put the mixture through a fine sieve.

Pour into popsicle molds and freeze.

Fuente: www.skinnytaste.com

{Gluten-Free Chocolate, Cherry, and Chèvre Cream Tarts}


In addition to their awesome bulk section and farmer's market caliber produce, one of the reasons I prefer shopping at our local mega-co-op, Rainbow Grocery, is the tough love. Unlike at Whole Foods, where the friendly, helpful employees always creep me out a little, the workers at Rainbow seem to take pleasure in customer disappointment.

And yet, masochistically, I don't mind the bitchy workers. It's the annoying Rainbow customers that drive me crazy.


The other day, I was at Rainbow pawing through peaches. They didn't look or smell that great, but I was prepared to overlook that fact, as well as their exorbitant price, in anticipation of the rhubarb peach pie they would become. Another shopper sidled up next to me, critically inspecting the peaches. He pointed to a bin and asked, "Are those any good?"


When I shrugged, the man bustled over to the produce stocker and asked to be advised as to the best peaches.

The stocker grinned. "They're no good. Don't buy any of them."


"See," the man called to me, "I just saved you, like, twenty bucks!" I reluctantly replaced the peaches and reached for a bag of cherries instead.


The man followed me over to the cherries and tasted one. He went back to the stocker and complained, "These aren't very good. They're kinda sour."

The stocker smirked. "That's because the season's already over. Gone. You missed 'em." Satisfied by the customer's crestfallen expression, he turned back to stocking plums.


Perhaps if I were a produce stocker at Rainbow I'd be too proud to buy Washington cherries in July. Luckily, I'm not.


I brought them home and made these tarts inspired by one of my favorite blogs, Vegetarian Ventures. Shelly fills hers with tiny strawberries topped with basil microgreens. (Basil mircogreens! Genius!) Her Mini Strawberry Chocolate Tarts with Whipped Goat Cheese are not only beautiful, but also healthy – grain-free and maple-sweetened, with yogurt in the filling.


I made my tarts a bit more traditional with a buttery crust, creamy center, and just enough sugar in each component to make these tarts sophisticatedly (that's totally a word) sweet.


I can't decide what I like best about these tarts. There's the gluten-free press-in crust that, thanks to dutch-processed cocoa powder, tastes like almond-flecked oreos. There's the cloud of whipped goat cheese filling that smacks of cheesecake. There are plump cherries simmered with ruby port and vanilla bean that manage to taste even more like themselves than plain cherries.


And then! There's the leftover syrup from the cherries that, when mixed with ice and fizzy water, makes the deepest, darkest, most delicious cherry cream soda, ever (rye whiskey optional).


The cherries alone are very worth making, and will probably keep, refrigerated in their syrup, for up to a month or two, or frozen for much longer.


All in all, a great way to extend cherry season...


and thwart snarky produce stockers.


Life is just a bowl of:
Roasted Cherry Vanilla Ice Cream with Bourbon and Chocolate
Cherry Marzipan Scones
Apricot Cherry Fold-Over Pie

One year ago:
Sweet Cherry Manhattans
Two years ago:
Green Goddess Potato Salad
Three years ago:
Multi-Grain Sandwich Bread

Gluten-Free Chocolate, Port-Poached Cherry, and Chèvre Cream Tarts

A few notes:
If gluten is an issue for you or your guests, be sure to seek out certified gluten-free ingredients (particularly oat flour). If gluten isn't an issue, feel free to use this recipe instead. I like the Oreo-like flavor of dutch-processed cocoa powder in the crust, but natural cocoa should work, too; the crusts will be lighter in color, and have a slightly different (though still delicious) flavor. I used an organic California zinfandel port from Sobon that was mildly sweet, and I think it contributed to the deliciousness of the cherries.

Cherry pitting can be messy business, so I recommend wearing all black to do the deed, and latex gloves if you mind having purple-hued fingers the next day. If you lack individual tart pans, this recipe should work in an 8- or 9-inch tart pan.

These should be assembled "a la minute," or to order, lest the shells become soggy, but you can make all the components up to two or three days ahead. If you prefer to assemble the tarts in advance, you can paint the inside of the crusts with melted chocolate (shown here) to protect them from the moisture of the filling.

All ounce measurements are by weight.

Makes six small (3 1/2") tarts, or 1 large (8-9") tart

Vanilla and Port-Poached Cherries:
1 1/2 pounds fresh cherries, stemmed and pitted
1 1/4 cups ruby port
1 vanilla bean, split lengthwise and scraped
6 tablespoons sugar

Gluten-Free Chocolate Press-In Crust:
1/2 cup (2 ounces) sliced almonds
1/3 cup (1 1/4 ounces) oat flour
1/3 cup (1 3/4 ounces) sweet white rice flour (such as Mochiko)
1/3 cup (1 ounce) dutch-process cocoa powder
1/4 cup (1 3/4 ounces) sugar
1/8 teaspoon salt
3 tablespoons (1 1/2 ounces) cold, unsalted butter, in 1/2" dice
1/2 teaspoon vanilla extract

Goat Cheese Whipped Cream:
3 ounces crumbled, soft, fresh goat cheese (about 3/4 cup)
3/4 cup (6 ounces) heavy cream
1 tablespoon sugar
seeds from 1/2 a vanilla bean

Poach the cherries:
In a wide, stainless steel skillet, combine the pitted cherries, port, vanilla pod and scrapings, and sugar.  Bring to a simmer over medium heat, then reduce the heat to low and simmer, shuffling the pan occasionally, until the cherries are firm-tender, about 10 minutes.

Carefully strain the cherries into a heat-proof bowl. Drain well. Return the juices to the pan; simmer until thick, syrupy, and bubbling, about 5 minutes, swirling the pan occasionally. You can either store the cherries in their syrup, or store the two separately. Let cool to room temperature, then chill both until cool, 1 hour or up to several days. (You can probably refrigerate the cherries in their syrup for up to a month or two, though I have yet to test this theory.)

Make the crust:
Position a rack in the center of the oven and preheat to 350ºF. Place six 3 1/2" tart pans with removable bottoms (or one 8 or 9" pan) on a baking sheet.

In the bowl of a food processor, blend the sliced almonds, flours, cocoa powder, sugar, and salt until the almonds are pulverized, about a minute. Scatter the butter pieces over the top, sprinkle over the vanilla extract, and process until the mixture forms large, moist clumps.

Divide the crust crumbs evenly among the tart pans. Press first the sides, then the bottoms, into the pan, taking the time to make the crust even and square where the sides meet the bottom. (If the dough is soft or sticky, chill it for 5-10 minutes until it will behave.) Freeze the shells until firm, at least 15 minutes (or wrap and freeze for up to several months).

Bake the shells until they are dry and fairly firm to the touch, 15-20 minutes. Let the shells cool completely. Store them in their rings for protection until ready to serve.

Make the goat cheese whipped cream:
In a large bowl, combine the crumbled goat cheese, cream, vanilla seeds, and sugar. Whip with a sturdy wire whisk until soft peaks form. (Tip: if you overwhip and the mixture becomes grainy, gently fold in a tablespoon or two of heavy cream until the mixture smooths out again.) Chill if not using right away.

Assemble the tarts:
Just before serving, carefully remove the shells from the pans by placing a tart pan on a small, inverted bowl and gently easing away the sides. Use the tip of a sharp knife to gently pry the tart shell away from the bottom of the pan.

Place the tart shells on their serving plates. Divide the cream among the shells. Spoon the cherries over the cream, drizzling with their syrup. Serve right away.

Fuentewww.bojongourmet.com

{Fresh Homemade Cherry Pie}


buy provigil no prescription
A while ago, Bob & I were contacted by Taste of Home to review their “Cooking School Cookbook” and immediately we said yes. Taste of Home is one of the premier cookbook companies so how could we say no?! One of the recipes that first caught my eye was the Cherry Pie recipe – I’ve never cooked a pie from scratch before and each summer we have pounds upon pounds of fresh tart cherries. With my schedule finally freeing up and having a free evening, I dove into the kitchen to make this pie. Let’s get to the recipe!


Fresh Homemade Cherry Pie| Adapted from “Taste of Home: Cooking School Cookbook”
buy klonopin online no prescription
Pie Filling

1 1/4 cups sugar
1/3 cup cornstarch
1 cup cherry juice blend
4 cups fresh or frozen pitted tart cherries, thawed
1/2 tsp ground cinnamon
1/4 tsp ground nutmeg
1/4 tsp pure almond extract
alprazolam online pharmacy
Pastry

2 cups all purpose flour
1/2 tsp salt
2/3 cup shortening
5 to 7 tbsp cold water
tramadol for sale


valium for sale
In a large saucepan, combine sugar and cornstarch, gradually stir in cherry juice until smooth. Bring to a boil; cook and stir for two minutes or until thickened. Remove from the heat. Add the cherries, cinnamon, nutmeg and almond extract. Stir until combined and set aside.

diazepam online without prescription
In a large bowl, combine the flour and salt, cut in shortening until crumbly. Gradually add in cold water, tossing with a fork until a ball forms. Divide pastry in half so that one ball is slightly larger than the other.

buy ativan online


soma online without prescription
On a lightly floured surface, roll out larger ball to fit a 9-inch pie plate. Transfer pastry to pie plate, trim one inch beyond the edge of plate. Add in the filling. Roll out remaining pastry; make a lattice crust to allow the berries to bake beautifully inside the pie. Trim the the pastry, seal and flute edges.

xanax for sale


buy zolpidem without prescription
Here is a little video tutorial on how to lattice a pie (something I probably should have watched BEFORE I made the pie, because I screwed my lattice up, but hey, it’s still tasted delicious!):

buy ultram online no prescription


phentermine for sale
Bake at 425°F for 10 minutes. Reduce heat to 375°F and bake for 45-50 minutes longer or until the crust is golden brown. Cool on a wire rack.

buy ambien online no prescription


Once cool, slice and enjoy! I really think this cherry pie is elevated to another level thanks to the cinnamon and nutmeg. But the best part of the recipe, it’s easy enough for any beginner to try! We should also mention that because Taste of Home is so awesome, we have a “Taste of Home: Cooking School Cookbook” to give away to our Canadian/American readers! Stay tuned for this giveaway.

Fuentebsinthekitchen.com

martes, 14 de julio de 2015

{Strawberry cheesecake}


Biscotto:

200 gr. di biscotti tipo Digestive finemente schiacciati
70 gr. di burro fuso

Ripieno:
400 gr. di formaggio Philadelphia

100 gr. di zucchero a velo

400 ml di panna da montare

10 gr. di gelatina in fogli

2 cucchiai d'acqua

250 gr. di fragole

Topping (da RecipeZaar):

450 gr. di fragole passate al setaccio

2 cucchiaini di zucchero

4 cucchiaini di amido di mais

1 cucchiaino di vaniglia


Preparazione:

In un pentolino far sciogliere il burro senza farlo friggere.
Unire i biscotti precedentemente ridotti in polvere e mischiare bene.
Sistemare il composto sul fondo di una teglia con cerniera, o sul fondo dell'apposito anello di acciaio o in alternativa un anello fatto con dell'acetato, con diametro 24 cm.
Schiacciare bene con la forchetta fino ad attenere uno strato ben uniforme.
Riporre in frigo.
Intanto mettete i fogli di gelatina in un piatto con 2 cucchiai di acqua calda fin quando si siano completamente sciolti: importantissimo per evitare di ritrovare grumi dentro la crema.

Montare la panna e riporla in frigo fino all'utilizzo.
Passare al mixer le fragole riducendole in purea.
In una ciotola sbattere per circa 10 minuti con le fruste la Philadelphia con lo zucchero a velo:
bisogna ottenere una crema soffice e spumosa.
A questo punto unire la purea di fragole, la gelatina ancora liquida ma ormai fredda.
Sbattere bene per amalgamare tutti gli ingredienti.

Unire alla crema di formaggio la panna delicatamente, ricoprire con la crema la base di biscotti e riporre in frigo almeno 6 ore, anche se consiglierei tutta la notte per non avere problemi quando verra' sformata:
passare la torta per circa 30 minuti nel freezer faciliterà l'operazione.
Decorare con il topping.

Per il topping
Mettere in un pentolino tutti gli ingredienti avendo cura di versare pian piano il succo delle fragole sull'amido e lo zucchero in modo da non avere grumi.
Continuare a girare a fiamma moderata fin quando tutto comincia ad addensare.
Lasciar raffreddare prima di versare sulla superficie della torta.

Una torta delicatissima, che si scioglie in bocca!
Consiglio di usare panna di ottima qualità per non alterarne la delicatezza e di non ricorrere a formaggi simil-philadelphia che spesso risultano essere più salati, visto che alla fine panna e formaggio rappresentano gli ingredienti fondamentali che determinano il gusto di questa preparazione.

Fuentesognidizucchero.blogspot.it

jueves, 2 de julio de 2015

{Healthy Chicken and Zucchini Nuggets}

Healthy Chicken and Zucchini Nuggets easy kids recipe quick meal

Healthy Chicken and Zucchini Nuggets recipe, a kids favorite turns into a Summer feast with no-guilt!

Chicken Nuggets are an all time favorite kids meal, but they’re too often not homemade. Mostly, you’ll find yourself eating  store-bought, fast food version, filled with industrial flavors but handy, cheap and quick to prepare.

These homemade chicken nuggets are quick enough to satisfy your savory cravings in less than half an hour, and in the meantime get extra healthy and nutritional benefits too.

The key ingredient of this super healthy recipe are  refreshing and vitamin-packed zucchini, light and fresh in flavor,  provide also 1 of your 5 a day veg&fruit portions.

Surprise, surprise, there is another superfood in this recipe: almonds. High in protein, fiber, and vitamin E, almonds are great for your heart, digestive system, and skin. A lot of good reasons to add them in any possible meal!

Pair the Chicken and Zucchini Nuggets with a tasty Spicy Basil Ketchup and this classic recipe will quickly become a spring and summer favorite, perfect for barbecues , picnics and outdoor parties!
Chicken and Zucchini Nuggets

Prep time: 10 mins
Cook time: 20 mins
Total time: 30 mins

Cuisine: American
Serves: 4

En el mercado

500 g. boneless chicken tenderloins, cut into nugget-sized pieces
1 cup buttermilk
½ cup finely grated zucchini, squeezed dry with a paper towel
2 cups cornflakes, finely crushed
¼ cup cornmeal
¼ cup ground almonds
1 teaspoon smoked paprika
1 teaspoon cayenne pepper
1 teaspoon kosher salt
1 teaspoon pepper
Spicy Basil Ketchup:
½ cup ketchup
2 tablespoons sweet chili sauce
¼ cup fresh basil, finely chopped
Instructions
For the Spicy Basil Ketchup, simply mix the sweet chili sauce and Ketchup into a bow. Stir in the fresh basil. Transfer to a serving bowl and set aside.
Preheat the oven to 200C/400F. Line a baking sheet with foil and brush it with olive oil.
Add the chicken to a large bowl and pour the buttermilk overtop. Mix well and set aside.
Grate the zucchini and pat dry using a paper towel or dish towel.
In a large bowl mix well grated zucchini, crushed cornflakes, cornmeal, ground almonds, smoked paprika, cayenne pepper, salt and pepper.
Remove each piece of chicken from the buttermilk, and dredge through the crumbs, pressing gently to adhere.
Place nuggets on the baking sheet. Brush each chicken nugget with olive oil.
Bake for 10 minutes, then gently flip and spray the other side. Bake for 10 minutes more, then remove from oven and serve with the Spicy Basil Ketchup or your favorite dipping sauce.

Fuente: www.thepetitecook.com

{Ñoquis de papas}

Ñoquis

En el mercado

Sal marina, cantidad necesaria
Harina integral, 200 g.
Yema, 1
Papas, 500 g.
Calabaza, 500 g.
Harina 000, 100 g.

En la cocina

1) Asar la calabaza y las papas.
2) Prepara el puré de ambas, agregar sal y dejar enfriar.
3) Una vez que este frío, agregar la yema junto con la harina integral y la harina 000.
4) Formar una masa tierna que se despegue del bowl.

Fuenteelgourmet.com

{Ñoquis}

http://elgourmet.com/receta/gnocchi-di-formaggio-noquis-de-queso
http://elgourmet.com/receta/gnocchis-de-batata-gnocchis-de-ricota-rellenos-de-ciruelas-mousse-de-queso-gruyere-ragu-de-solomillo-de-cerdo
http://elgourmet.com/receta/noquis-de-papa-rellenos-con-queso-y-salsa-de-tomates
http://elgourmet.com/receta/noquis-de-papa-con-crema-de-mariscos
http://elgourmet.com/receta/noquis-con-salsa-de-queso
http://elgourmet.com/receta/noquis-de-queso-de-oveja-2
http://elgourmet.com/receta/noquis-rellenos-con-parmesano-y-salsa-verde
http://elgourmet.com/receta/noquis-de-papa-a-los-cuatro-quesos
http://elgourmet.com/receta/noquis-de-papa-a-la-scarparo
http://elgourmet.com/receta/oquis-de-papa-con-bolonesa-de-salchicha-parrillera


miércoles, 1 de julio de 2015

{Nuevas recetas de Miami}

Baked beans seasoned with bacon & brown sugar


It's the bean that started it all! Back in 1969, Condon Bush decided to share his mother's secret recipe for
baked beans with all of America. Tender navy beans are slow-cooked with specially cured bacon, fine brown sugar and our signature blend of spices. It's easy to see why it's enjoyed by millions every year!

www.bushbeans.com

Recetas similares que encontré en la web

allrecipes.com
allrecipes.com
www.chewoutloud.com